|


Am avut 374443 vizite de la lansarea siteului.
|
|
Inapoi
Inainte
Cuprins
1: Introduction to Objects
Thinking in C++, 2nd ed. Volume 1
©2000 by Bruce Eckel
1: Introduction to Objects
The genesis of the computer
revolution was in a machine. The genesis of our programming languages thus tends
to look like that machine.
But computers are not so much machines as
they are mind amplification tools (“bicycles for the mind,” as Steve
Jobs is fond of saying) and a different kind of expressive medium. As a result,
the tools are beginning to look less like machines and more like parts of our
minds, and also like other expressive mediums such as writing, painting,
sculpture, animation, and filmmaking. Object-oriented programming is part of
this movement toward using the computer as an expressive
medium.
This chapter will introduce you to the
basic
concepts of object-oriented programming (OOP), including an overview of OOP
development methods. This chapter, and this book, assume
that you have had experience in a procedural programming language, although not
necessarily C. If you think you need more preparation in programming and the
syntax of C before tackling this book, you should work through the
“Thinking in C: Foundations for C++ and Java” training CD ROM, bound
in with this book and also available at www.BruceEckel.com.
This chapter is background and
supplementary material. Many people do not feel comfortable wading into
object-oriented programming without understanding the big picture first. Thus,
there are many concepts that are introduced here to give you a solid overview of
OOP. However, many other people don’t get the big picture concepts until
they’ve seen some of the mechanics first; these people may become bogged
down and lost without some code to get their hands on. If you’re part of
this latter group and are eager to get to the specifics of the language, feel
free to jump past this chapter – skipping it at this point will not
prevent you from writing programs or learning the language. However, you will
want to come back here eventually to fill in your knowledge so you can
understand why objects are important and how to design with
them.
The progress of abstraction
All programming languages provide
abstractions. It can be argued that the complexity of the problems you’re
able to solve is directly related to the kind and quality of
abstraction. By “kind” I mean, “What is
it that you are abstracting?” Assembly language is a small abstraction of
the underlying machine. Many so-called “imperative” languages that
followed (such as Fortran, BASIC, and C) were abstractions of assembly language.
These languages are big improvements over assembly language, but their primary
abstraction still requires you to think in terms of the structure of the
computer rather than the structure of the problem you are trying to solve. The
programmer must establish the association between the machine model (in the
“solution space,” which
is the place where you’re modeling that problem, such as a computer) and
the model of the problem that is actually being solved (in the
“problem space,” which
is the place where the problem exists). The effort required to perform this
mapping, and the fact that it is extrinsic to the programming language, produces
programs that are difficult to write and expensive to maintain, and as a side
effect created the entire “programming methods”
industry.
The alternative to modeling the machine
is to model the problem you’re trying to solve. Early languages such as
LISP and APL chose particular views of the world (“All problems are
ultimately lists” or “All problems are algorithmic”). PROLOG
casts all problems into chains of decisions. Languages have been created for
constraint-based programming and for programming exclusively by manipulating
graphical symbols. (The latter proved to be too restrictive.) Each of these
approaches is a good solution to the particular class of problem they’re
designed to solve, but when you step outside of that domain they become awkward.
The object-oriented approach goes a step
farther by providing tools for the programmer to represent elements in the
problem space. This representation is general enough that the programmer is not
constrained to any particular type of problem. We refer to the elements in the
problem space and their representations in the solution space
as “objects.” (Of course, you will also need
other objects that don’t have problem-space analogs.) The idea is that the
program is allowed to adapt itself to the lingo of the problem by adding new
types of objects, so when you read the code describing the solution,
you’re reading words that also express the problem. This is a more
flexible and powerful language abstraction than what we’ve had before.
Thus, OOP allows you to describe the problem in terms of the problem, rather
than in terms of the computer where the solution will run. There’s still a
connection back to the computer, though. Each object looks quite a bit like a
little computer; it has a state, and it has operations that you can ask it to
perform. However, this doesn’t seem like such a bad analogy to objects in
the real world; they all have characteristics and behaviors.
Some language designers have decided that
object-oriented programming by itself is not adequate to easily solve all
programming problems, and advocate the combination of various approaches into
multiparadigm programming
languages.[4]
Alan Kay summarized five
basic characteristics of Smalltalk,
the first successful object-oriented language and one of the languages upon
which C++ is based. These characteristics represent a pure approach to
object-oriented
programming:
- Everything is an
object. Think of an object as a fancy variable;
it stores data, but you can “make requests” to that object, asking
it to perform operations on itself. In theory, you can take any conceptual
component in the problem you’re trying to solve (dogs, buildings,
services, etc.) and represent it as an object in your
program.
- A program is a bunch of objects
telling each other what to do by sending
messages. To make a request of an object, you
“send a message” to that object. More concretely, you can think of a
message as a request to call a function that belongs to a particular
object.
- Each object has its own memory made
up of other objects. Put another way, you create
a new kind of object by making a package containing existing objects. Thus, you
can build complexity in a program while hiding it behind the simplicity of
objects.
- Every object has a
type. Using the parlance, each object is an
instance of a class, in which “class” is synonymous
with “type.” The most important distinguishing characteristic of a
class is “What messages can you send to
it?”
- All objects of a particular type
can receive the same messages. This is actually
a loaded statement, as you will see later. Because an object of type
“circle” is also an object of type “shape,” a circle is
guaranteed to accept shape messages. This means you can write code that talks to
shapes and automatically handles anything that fits the description of a shape.
This substitutability is one of the most powerful concepts in
OOP.
An object has an interface
Aristotle was probably the first to begin
a careful study of the concept of type; he spoke of “the class of
fishes and the class of birds.” The idea that all objects, while being
unique, are also part of a class of objects that have characteristics and
behaviors in common was used directly in the first object-oriented language,
Simula-67, with its fundamental keyword class that introduces a new type
into a program.
Simula,
as its name implies, was created for developing simulations such as the classic
“bank teller
problem[5].” In
this, you have a bunch of tellers, customers, accounts, transactions, and units
of money – a lot of “objects.” Objects that are identical
except for their state during a program’s execution are grouped together
into “classes of objects” and that’s where the
keyword class came from.
Creating abstract data types (classes) is a fundamental concept in
object-oriented programming. Abstract data types work almost exactly like
built-in types: You can create variables of a type (called objects or
instances in object-oriented parlance) and manipulate those variables
(called sending messages or
requests; you send a message and the object figures
out what to do with it). The members (elements) of each class share some
commonality: every account has a balance, every teller can accept a deposit,
etc. At the same time, each member has its own state, each account has a
different balance, each teller has a name. Thus, the tellers, customers,
accounts, transactions, etc., can each be represented with a unique entity in
the computer program. This entity is the object, and each object belongs to a
particular class that defines its characteristics and
behaviors.
So, although what we really do in
object-oriented programming is create new data types, virtually all
object-oriented programming languages use the “class” keyword. When
you see the word “type” think “class” and vice
versa[6].
Since a class describes a set of objects
that have identical characteristics (data elements) and behaviors
(functionality), a class is really a
data type because a floating point
number, for example, also has a set of characteristics and behaviors. The
difference is that a programmer defines a class to fit a problem rather than
being forced to use an existing data type that was designed to represent a unit
of storage in a machine. You extend the programming language by adding new data
types specific to your needs. The programming system welcomes the new classes
and gives them all the care and type-checking that it gives to built-in
types.
The object-oriented approach is not
limited to building simulations. Whether or not you agree that any program is a
simulation of the system you’re designing, the use of OOP techniques can
easily reduce a large set of problems to a simple solution.
Once a class is established, you can make
as many objects of that class as you like, and then manipulate those objects as
if they are the elements that exist in the problem you are trying to solve.
Indeed, one of the challenges of object-oriented programming is to create a
one-to-one mapping between the elements in the problem space and objects in the
solution space.
But how do you get an object to do useful
work for you? There must be a way to make a request of the object so that it
will do something, such as complete a transaction, draw something on the screen
or turn on a switch. And each object can satisfy only certain requests. The
requests you can make of an object are defined by its interface, and the
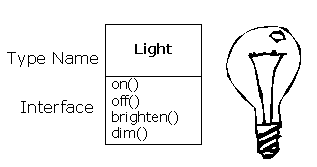
type is what determines the interface. A simple example might be a
representation of a light bulb:
Light lt;
lt.on();
The interface establishes what
requests you can make for a particular object. However, there must be code
somewhere to satisfy that request. This, along with the hidden data, comprises
the implementation. From a procedural programming
standpoint, it’s not that complicated. A type has a function associated
with each possible request, and when you make a particular request to an object,
that function is called. This process is usually summarized by saying that you
“send a message” (make a request) to an object, and the object
figures out what to do with that message (it executes code).
Here, the name of the type/class is
Light, the name of this particular Light object is lt,
and the requests that you can make of a Light object are to turn it
on, turn it off, make it brighter or make it dimmer. You create a Light
object by declaring a name (lt) for that object. To send a message to
the object, you state the name of the object and connect it to the message
request with a period (dot). From the standpoint of the user of a pre-defined
class, that’s pretty much all there is to programming with
objects.
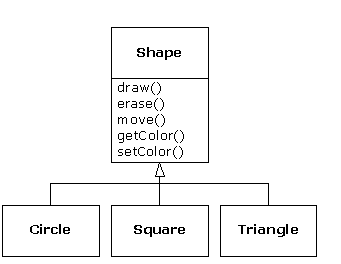
The diagram shown above follows the
format of the Unified Modeling
Language (UML). Each class is represented by a box, with the type name in
the top portion of the box, any data members that you care to describe in the
middle portion of the box, and the
member functions (the
functions that belong to this object, which receive any messages you send to
that object) in the bottom portion of the box. Often, only the name of the class
and the public member functions are shown in UML design diagrams, and so the
middle portion is not shown. If you’re interested only in the class name,
then the bottom portion doesn’t need to be shown,
either.
The hidden implementation
It is helpful to break up the playing
field into class creators (those who create new
data types) and client
programmers[7]
(the class consumers who use the data types in their applications). The goal of
the client programmer is to collect a toolbox full of classes to use for rapid
application development. The goal of the class creator is to build a class that
exposes only what’s necessary to the client programmer and keeps
everything else hidden. Why? Because if it’s hidden, the client programmer
can’t use it, which means that the class creator can change the hidden
portion at will without worrying about the impact to anyone else. The hidden
portion usually represents the tender insides of an object that could easily be
corrupted by a careless or uninformed client programmer, so hiding the
implementation reduces program bugs. The concept of
implementation hiding cannot be
overemphasized.
In any relationship it’s important
to have boundaries that are respected by all parties involved. When you create a
library, you establish a relationship with the client programmer, who is
also a programmer, but one who is putting together an application by using your
library, possibly to build a bigger library.
If all the members of a class are
available to everyone, then the client programmer can do anything with that
class and there’s no way to enforce rules. Even though you might really
prefer that the client programmer not directly manipulate some of the members of
your class, without access control there’s no way to prevent it.
Everything’s naked to the world.
So the first reason for access control is
to keep client programmers’ hands off portions they shouldn’t touch
– parts that are necessary for the internal machinations of the data type
but not part of the interface that users need in order to solve their particular
problems. This is actually a service to users because they can easily see
what’s important to them and what they can ignore.
The second reason for access control is
to allow the library designer to change the internal workings of the class
without worrying about how it will affect the client programmer. For example,
you might implement a particular class in a simple fashion to ease development,
and then later discover that you need to rewrite it in order to make it run
faster. If the interface and implementation are clearly separated and protected,
you can accomplish this easily and require only a relink by the
user.
C++ uses three explicit keywords to set
the boundaries in a class: public, private, and protected.
Their use and meaning are quite straightforward. These access specifiers
determine
who can use the definitions that follow. public
means the following definitions are available to
everyone. The private keyword, on the other hand,
means that no one can access those definitions except you, the creator of the
type, inside member functions of that type. private is a brick wall
between you and the client programmer. If someone tries to access a
private member, they’ll get a compile-time error.
protected acts just like private, with the
exception that an inheriting class has access to protected members, but
not private members. Inheritance will be introduced
shortly.
Reusing the implementation
Once a class has been created and tested,
it should (ideally) represent a useful unit of code. It turns out that this
reusability is not nearly so easy to achieve as many
would hope; it takes experience and insight to produce a good design. But once
you have such a design, it begs to be reused. Code reuse is one of the greatest
advantages that object-oriented programming languages provide.
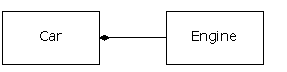
The simplest way to reuse a class is to
just use an object of that class directly, but you can also place an object of
that class inside a new class. We call this “creating a
member object.” Your new
class can be made up of any number and type of other objects, in any combination
that you need to achieve the functionality desired in your new class. Because
you are composing a new class from existing classes, this concept is called
composition (or more generally,
aggregation). Composition is often referred to as
a “has-a” relationship, as in “a car
has an engine.”
(The above UML
diagram indicates composition with the filled diamond, which states there is one
car. I will typically use a simpler form: just a line, without the diamond, to
indicate an
association.[8])
Composition comes with a great deal of
flexibility. The member objects of your new class are usually private, making
them inaccessible to the client programmers who are using the class. This allows
you to change those members without disturbing existing client code. You can
also change the member objects at runtime, to dynamically change the behavior of
your program. Inheritance, which is described next, does not have this
flexibility since the compiler must place compile-time restrictions on classes
created with inheritance.
Because inheritance is so important in
object-oriented programming it is often highly emphasized, and the new
programmer can get the idea that inheritance should be used everywhere. This can
result in awkward and overly-complicated designs. Instead, you should first look
to composition when creating new classes, since it is simpler and more flexible.
If you take this approach, your designs will stay cleaner. Once you’ve had
some experience, it will be reasonably obvious when you need
inheritance.
Inheritance:
reusing the interface
By itself, the idea of an object is a
convenient tool. It allows you to package data and functionality together by
concept, so you can represent an appropriate problem-space idea rather
than being forced to use the idioms of the underlying machine. These concepts
are expressed as fundamental units in the programming language by using the
class
keyword.
It seems a pity, however, to go to all
the trouble to create a class and then be forced to create a brand new one that
might have similar functionality. It’s nicer if we can take the existing
class, clone it, and then make additions and modifications to the clone. This is
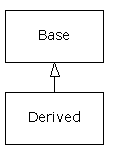
effectively what you get with inheritance, with
the exception that if the original class (called the base or super
or parent class) is changed, the modified “clone” (called the
derived or inherited or sub or child class)
also reflects those changes.
(The arrow in the above UML diagram
points from the derived class to the base class. As you will see, there can be
more than one derived class.)
A type does more than describe the
constraints on a set of objects; it also has a relationship with other types.
Two types can have characteristics and behaviors in common, but one type may
contain more characteristics than another and may also handle more messages (or
handle them differently). Inheritance expresses this similarity between types
using the concept of base types
and derived types. A base type
contains all of the characteristics and behaviors that are shared among the
types derived from it. You create a base type to represent the core of your
ideas about some objects in your system. From the base type, you derive other
types to express the different ways that this core can be
realized.
For example, a trash-recycling machine
sorts pieces of trash. The base type is “trash,” and each piece of
trash has a weight, a value, and so on, and can be shredded, melted, or
decomposed. From this, more specific types of trash are derived that may have
additional characteristics (a bottle has a color) or behaviors (an aluminum can
may be crushed, a steel can is magnetic). In addition, some behaviors may be
different (the value of paper depends on its type and condition). Using
inheritance, you can build a type hierarchy that expresses the problem
you’re trying to solve in terms of its types.
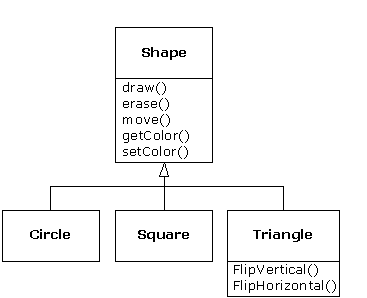
A second example is the classic
“shape” example, perhaps used in a
computer-aided design system or game simulation. The base type is
“shape,” and each shape has a size, a color, a position, and so on.
Each shape can be drawn, erased, moved, colored, etc. From this, specific types
of shapes are derived (inherited): circle, square, triangle, and so on, each of
which may have additional characteristics and behaviors. Certain shapes can be
flipped, for example. Some behaviors may be different, such as when you want to
calculate the area of a shape. The type hierarchy embodies both the similarities
and differences between the shapes.
 Casting the solution in the same terms as
the problem is tremendously beneficial because you don’t need a lot of
intermediate models to get from a description of the problem to a description of
the solution. With objects, the type hierarchy is the primary model, so you go
directly from the description of the system in the real world to the description
of the system in code. Indeed, one of the difficulties people have with
object-oriented design is that it’s too simple to get from the beginning
to the end. A mind trained to look for complex solutions is often stumped by
this simplicity at first.
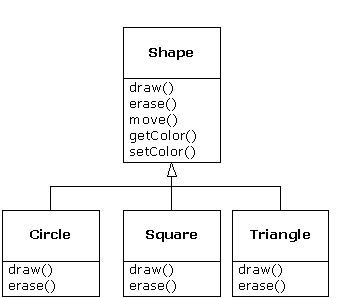
When you inherit from an existing type,
you create a new type. This new type contains not only all the members of the
existing type (although the private ones are hidden away and
inaccessible), but more importantly it duplicates the interface of the base
class. That is, all the messages you can send to objects of the base class you
can also send to objects of the derived class. Since we know the type of a class
by the messages we can send to it, this means that the derived class is the
same type as the base class. In the previous example, “a circle is a
shape.” This type equivalence via inheritance is one of the fundamental
gateways in understanding the meaning of object-oriented
programming.
Since both the base class and derived
class have the same interface, there must be some implementation to go along
with that interface. That is, there must be some code to execute when an object
receives a particular message. If you simply inherit a class and don’t do
anything else, the methods from the base-class interface come right along into
the derived class. That means objects of the derived class have not only the
same type, they also have the same behavior, which isn’t particularly
interesting.
You have two ways to differentiate your
new derived class from the original base class. The first is quite
straightforward: You simply add brand new functions to the derived class. These
new functions are not part of the base class interface. This means that the base
class simply didn’t do as much as you wanted it to, so you added more
functions. This simple and primitive use for
inheritance is, at times, the
perfect solution to your problem. However, you should look closely for the
possibility that your base class might also need these additional functions.
This process of discovery and iteration of your design happens regularly in
object-oriented programming.
Although inheritance may sometimes imply
that you are going to add new functions to the interface, that’s not
necessarily true. The second and more important way to differentiate your new
class is to change the behavior of an existing base-class function. This
is referred to as
overriding that
function.
To override a function, you simply create
a new definition for the function in the derived class. You’re saying,
“I’m using the same interface function here, but I want it to do
something different for my new
type.”
Is-a vs. is-like-a relationships
There’s a certain debate that can
occur about inheritance: Should inheritance override only base-class
functions (and not add new member functions that aren’t in the base
class)? This would mean that the derived type is exactly the same type as
the base class since it has exactly the same interface. As a result, you can
exactly substitute an object of the derived class for an object of the base
class. This can be thought of as pure
substitution, and it’s often referred to as the
substitution principle. In a sense, this is the
ideal way to treat inheritance. We often refer to the relationship between the
base class and derived classes in this case as an is-a relationship,
because you can say “a circle is a shape.” A test for
inheritance is to determine whether you can state the is-a relationship about
the classes and have it make sense.
There are times when you must add new
interface elements to a derived type, thus extending the interface and creating
a new type. The new type can still be substituted for the base type, but the
substitution isn’t perfect because your new functions are not accessible
from the base type. This can be described as an is-like-a relationship;
the new type has the interface of the old type but it also contains other
functions, so you can’t really say it’s exactly the same. For
example, consider an air conditioner. Suppose your house is wired with all the
controls for cooling; that is, it has an interface that allows you to control
cooling. Imagine that the air conditioner breaks down and you replace it with a
heat pump, which can both heat and cool. The heat pump is-like-an air
conditioner, but it can do more. Because the control system of your house is
designed only to control cooling, it is restricted to communication with the
cooling part of the new object. The interface of the new object has been
extended, and the existing system doesn’t know about anything except the
original interface.
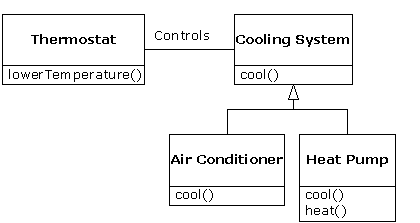 Of course, once you see this design it
becomes clear that the base class “cooling system” is not general
enough, and should be renamed to “temperature control system” so
that it can also include heating – at which point the substitution
principle will work. However, the diagram above is an example of what can happen
in design and in the real world.
When you see the substitution principle
it’s easy to feel like this approach (pure substitution) is the only way
to do things, and in fact it is nice if your design works out that way.
But you’ll find that there are times when it’s equally clear that
you must add new functions to the interface of a derived class. With inspection
both cases should be reasonably
obvious.
Interchangeable objects
with polymorphism
When dealing with type hierarchies, you
often want to treat an object not as the specific type that it is but instead as
its base type. This allows you to write code that doesn’t depend on
specific types. In the shape example, functions manipulate generic shapes
without respect to whether they’re circles, squares, triangles, and so on.
All shapes can be drawn, erased, and moved, so these functions simply send a
message to a shape object; they don’t worry about how the object copes
with the message.
Such code is unaffected by the addition
of new types, and adding new types is the most common way to extend an
object-oriented program to handle new situations. For example, you can derive a
new subtype of shape called pentagon without modifying the functions that
deal only with generic shapes. This ability to extend a program easily by
deriving new subtypes is important because it greatly improves designs while
reducing the cost of software maintenance.
There’s a problem, however, with
attempting to treat derived-type objects as their generic base types (circles as
shapes, bicycles as vehicles, cormorants as birds, etc.). If a function is going
to tell a generic shape to draw itself, or a generic vehicle to steer, or a
generic bird to move, the compiler cannot know at compile-time precisely what
piece of code will be executed. That’s the whole point – when the
message is sent, the programmer doesn’t want to know what piece of
code will be executed; the draw function can be applied equally to a circle, a
square, or a triangle, and the object will execute the proper code depending on
its specific type. If you don’t have to know what piece of code will be
executed, then when you add a new subtype, the code it executes can be different
without requiring changes to the function call. Therefore, the compiler cannot
know precisely what piece of code is executed, so what does it do? For example,
in the following diagram the BirdController object just works with
generic Bird objects, and does not know what exact type they are. This is
convenient from BirdController’s perspective, because it
doesn’t have to write special code to determine the exact type of
Bird it’s working with, or that Bird’s behavior. So
how does it happen that, when move( ) is called while ignoring the
specific type of Bird, the right behavior will occur (a Goose
runs, flies, or swims, and a Penguin runs or swims)?
 The answer is the primary twist in
object-oriented programming: The compiler cannot make a function call in the
traditional sense. The function call generated by a non-OOP compiler causes what
is called early binding, a
term you may not have heard before because you’ve never thought about it
any other way. It means the compiler generates a call to a specific function
name, and the linker resolves this call to the absolute address of the code to
be executed. In OOP, the program cannot determine the address of the code until
runtime, so some other scheme is necessary when a message is sent to a generic
object.
To solve the problem, object-oriented
languages use the concept of
late binding. When you send
a message to an object, the code being called isn’t determined until
runtime. The compiler does ensure that the function exists and performs type
checking on the arguments and return value (a language in which this isn’t
true is called weakly
typed), but it doesn’t know the exact code to
execute.
To perform late binding, the C++ compiler
inserts a special bit of code in lieu of the absolute call. This code calculates
the address of the function body, using information stored in the object (this
process is covered in great detail in Chapter 15). Thus, each object can behave
differently according to the contents of that special bit of code. When you send
a message to an object, the object actually does figure out what to do with that
message.
You state that you want a function to
have the flexibility of late-binding properties using the
keyword virtual. You
don’t need to understand the mechanics of virtual to use it, but
without it you can’t do object-oriented programming in C++. In C++, you
must remember to add the virtual keyword because, by default, member
functions are not dynamically bound. Virtual functions allow you to
express the differences in behavior of classes in the same family. Those
differences are what cause polymorphic behavior.
Consider the shape example. The family of
classes (all based on the same uniform interface) was diagrammed earlier in the
chapter. To demonstrate polymorphism, we want to write a single piece of code
that ignores the specific details of type and talks only to the base class. That
code is decoupled from type-specific information,
and thus is simpler to write and easier to understand. And, if a new type
– a Hexagon, for example – is added through
inheritance, the code you write will work just as well for the new type of
Shape as it did on the existing types. Thus, the program is
extensible.
If you write a function in C++ (as you
will soon learn how to do):
void doStuff(Shape& s) {
  s.erase();
  // ...
  s.draw();
}
This function speaks to any Shape,
so it is independent of the specific type of object that it’s drawing and
erasing (the ‘&’ means “Take the address of the
object that’s passed to doStuff( ),” but it’s not
important that you understand the details of that right now). If in some other
part of the program we use the doStuff( ) function:
Circle c;
Triangle t;
Line l;
doStuff(c);
doStuff(t);
doStuff(l);
The calls to doStuff( )
automatically work right, regardless of the exact type of the object.
This is actually a pretty amazing trick.
Consider the line:
doStuff(c);
What’s happening here is that a
Circle is being passed into a function that’s expecting a
Shape. Since a Circle is a Shape it can be treated
as one by doStuff( ). That is, any message that
doStuff( ) can send to a Shape, a Circle can accept.
So it is a completely safe and logical thing to do.
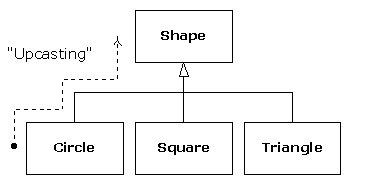
We call this process of treating a
derived type as though it were its base type
upcasting. The name cast
is used in the sense of casting into a mold and the up comes from the
way the inheritance diagram is
typically arranged, with the base type at the top and the derived classes
fanning out downward. Thus, casting to a base type is moving up the inheritance
diagram: “upcasting.”
An object-oriented program contains some
upcasting somewhere, because that’s how you decouple yourself from knowing
about the exact type you’re working with. Look at the code in
doStuff( ):
  s.erase();
  // ...
  s.draw();
Notice that it doesn’t say
“If you’re a Circle, do this, if you’re a
Square, do that, etc.” If you write that kind of code, which checks
for all the possible types that a Shape can actually be, it’s messy
and you need to change it every time you add a new kind of Shape. Here,
you just say “You’re a shape, I know you can erase( )
and draw( ) yourself, do it, and take care of the details
correctly.”
What’s impressive about the code in
doStuff( ) is that, somehow, the right thing happens. Calling
draw( ) for Circle causes different code to be executed than
when calling draw( ) for a Square or a Line, but when
the draw( ) message is sent to an anonymous Shape, the
correct behavior occurs based on the actual type of the Shape. This is
amazing because, as mentioned earlier, when the C++ compiler is compiling the
code for doStuff( ), it cannot know exactly what types it is dealing
with. So ordinarily, you’d expect it to end up calling the version of
erase( ) and draw( ) for Shape, and not for the
specific Circle, Square, or Line. And yet the right thing
happens because of polymorphism. The compiler and runtime system handle the
details; all you need to know is that it happens and more importantly how to
design with it. If a member function is virtual, then when you
send a message to an object, the object will do the right thing, even when
upcasting is involved.
Creating and destroying objects
Technically, the domain of OOP is
abstract data typing, inheritance, and polymorphism, but other issues can be at
least as important. This section gives an overview of these
issues.
Especially important is the way objects
are created and destroyed. Where is the data for an object and how is the
lifetime of that object controlled? Different programming languages use
different philosophies here. C++ takes the approach that control of efficiency
is the most important issue, so it gives the programmer a choice. For maximum
runtime speed, the storage and lifetime can be determined while the program is
being written, by placing the objects on the stack or in
static storage. The stack is an
area in memory that is used directly by the microprocessor to store data during
program execution. Variables on the stack are sometimes called
automatic or
scoped variables. The
static storage area is simply a fixed patch of memory that is allocated before
the program begins to run. Using the stack or static storage area places a
priority on the speed of storage allocation and release, which can be valuable
in some situations. However, you sacrifice flexibility because you must know the
exact quantity, lifetime, and type of objects while you’re writing
the program. If you are trying to solve a more general problem, such as
computer-aided design, warehouse management, or air-traffic control, this is too
restrictive.
The second approach is to create objects
dynamically in a pool of memory
called the heap. In this approach you don’t
know until runtime how many objects you need, what their lifetime is, or what
their exact type is. Those decisions are made at the spur of the moment while
the program is running. If you need a new object, you simply make it on the heap
when you need it, using the new
keyword. When you’re finished with the storage, you must release it
using the delete keyword.
Because the storage is managed
dynamically at runtime, the amount of time required to allocate storage on the
heap is significantly longer than the time to create storage on the stack.
(Creating storage on the stack is often a single microprocessor instruction to
move the stack pointer down, and another to move it back up.) The dynamic
approach makes the generally logical assumption that objects tend to be
complicated, so the extra overhead of finding storage and releasing that storage
will not have an important impact on the creation of an object. In addition, the
greater flexibility is essential to solve general programming
problems.
There’s another issue, however, and
that’s the lifetime of an
object. If you create an object on the stack or in static storage, the compiler
determines how long the object lasts and can automatically destroy it. However,
if you create it on the heap, the compiler has no knowledge of its lifetime. In
C++, the programmer must determine programmatically when to destroy the object,
and then perform the destruction using the delete keyword. As an
alternative, the environment can provide a feature called a
garbage collector that
automatically discovers when an object is no longer in use and destroys it. Of
course, writing programs using a garbage collector is much more convenient, but
it requires that all applications must be able to tolerate the existence of the
garbage collector and the overhead for garbage collection. This does not meet
the design requirements of the C++ language and so it was not included, although
third-party garbage collectors exist for
C++.
Exception handling:
dealing with errors
Ever since the beginning of programming
languages, error handling has been one of the most difficult issues. Because
it’s so hard to design a good error-handling scheme, many languages simply
ignore the issue, passing the problem on to library designers who come up with
halfway measures that can work in many situations but can easily be
circumvented, generally by just ignoring them. A major problem with most
error-handling schemes is that they rely on programmer vigilance in following an
agreed-upon convention that is not enforced by the language. If programmers are
not vigilant, which often occurs when they are in a hurry, these schemes can
easily be forgotten.
Exception
handling wires error handling directly into the programming language and
sometimes even the operating system. An exception is an object that is
“thrown” from the site of the error and can be “caught”
by an appropriate exception handler designed to handle that particular
type of error. It’s as if exception handling is a different, parallel path
of execution that can be taken when things go wrong. And because it uses a
separate execution path, it doesn’t need to interfere with your
normally-executing code. This makes that code simpler to write since you
aren’t constantly forced to check for errors. In addition, a thrown
exception is unlike an error value that’s returned from a function or a
flag that’s set by a function in order to indicate an error condition
– these can be ignored. An exception cannot be ignored so it’s
guaranteed to be dealt with at some point. Finally, exceptions provide a way to
recover reliably from a bad situation. Instead of just exiting the program, you
are often able to set things right and restore the execution of a program, which
produces much more robust systems.
It’s worth noting that exception
handling isn’t an object-oriented feature, although in object-oriented
languages the exception is normally represented with an object. Exception
handling existed before object-oriented languages.
Exception handling is only lightly
introduced and used in this Volume; Volume 2 (available from
www.BruceEckel.com) has thorough coverage of exception
handling.
Analysis and
design
The object-oriented paradigm is a new and
different way of thinking about programming and many folks have trouble at first
knowing how to approach an OOP project. Once you know that everything is
supposed to be an object, and as you learn to think more in an object-oriented
style, you can begin to create “good” designs that take advantage of
all the benefits that OOP has to offer.
A method
(often called a methodology) is a set of processes and heuristics
used to break down the complexity of a programming problem. Many OOP methods
have been formulated since the dawn of object-oriented programming. This section
will give you a feel for what you’re trying to accomplish when using a
method.
Especially in OOP, methodology is a field
of many experiments, so it is important to understand what problem the method is
trying to solve before you consider adopting one. This is particularly true with
C++, in which the programming language is intended to reduce the complexity
(compared to C) involved in expressing a program. This may in fact alleviate the
need for ever-more-complex methodologies. Instead, simpler ones may suffice in
C++ for a much larger class of problems than you could handle using simple
methodologies with procedural languages.
It’s also important to realize that
the term “methodology” is often too grand and promises too much.
Whatever you do now when you design and write a program is a method. It may be
your own method, and you may not be conscious of doing it, but it is a process
you go through as you create. If it is an effective process, it may need only a
small tune-up to work with C++. If you are not satisfied with your productivity
and the way your programs turn out, you may want to consider adopting a formal
method, or choosing pieces from among the many formal methods.
While you’re going through the
development process, the most important issue is this: Don’t get lost.
It’s easy to do. Most of the analysis and design
methods are intended to solve the largest of problems.
Remember that most projects don’t fit into that category, so you can
usually have successful analysis and design with a relatively small subset of
what a method
recommends[9].
But some sort of process, no matter how limited, will generally get you on your
way in a much better fashion than simply beginning to code.
It’s also easy to get stuck, to
fall into “analysis
paralysis,” where you feel like you can’t move forward because you
haven’t nailed down every little detail at the current stage. Remember, no
matter how much analysis you do, there are some things about a system that
won’t reveal themselves until design time, and more things that
won’t reveal themselves until you’re coding, or not even until a
program is up and running. Because of this, it’s crucial to move fairly
quickly through analysis and design, and to implement a test of the proposed
system.
This point is worth emphasizing. Because
of the history we’ve had with procedural languages, it is commendable that
a team will want to proceed carefully and understand every minute detail before
moving to design and implementation. Certainly, when creating a DBMS, it pays to
understand a customer’s needs thoroughly. But a DBMS is in a class of
problems that is very well-posed and well-understood; in many such programs, the
database structure is the problem to be tackled. The class of programming
problem discussed in this chapter is of the “wild-card” (my term)
variety, in which the solution isn’t simply re-forming a well-known
solution, but instead involves one or more
“wild-card factors” – elements for
which there is no well-understood previous solution, and for which research is
necessary[10].
Attempting to thoroughly analyze a wild-card problem before moving into design
and implementation results in analysis paralysis because you don’t have
enough information to solve this kind of problem during the analysis phase.
Solving such a problem requires iteration through the whole cycle, and that
requires risk-taking behavior (which makes sense, because you’re trying to
do something new and the potential rewards are higher). It may seem like the
risk is compounded by “rushing” into a preliminary implementation,
but it can instead reduce the risk in a wild-card project because you’re
finding out early whether a particular approach to the problem is viable.
Product development is risk management.
It’s often proposed that you
“build one to throw away.” With OOP, you may still throw part
of it away, but because code is encapsulated into classes, during the first
iteration you will inevitably produce some useful class designs and develop some
worthwhile ideas about the system design that do not need to be thrown away.
Thus, the first rapid pass at a problem not only produces critical information
for the next analysis, design, and implementation iteration, it also creates a
code foundation for that iteration.
That said, if you’re looking at a
methodology that contains tremendous detail and suggests many steps and
documents, it’s still difficult to know when to stop. Keep in mind what
you’re trying to discover:
- What are the objects? (How
do you partition your project into its component
parts?)
- What are
their interfaces? (What messages do you need to be able to send to each
object?)
If you come up with
nothing more than the objects and their interfaces, then you can write a
program. For various reasons you might need more descriptions and documents than
this, but you can’t get away with any less.
The process can be undertaken in five
phases, and a phase 0 that is just the initial commitment to using some kind of
structure.
Phase 0: Make a plan
You must first decide what steps
you’re going to have in your process. It sounds simple (in fact,
all of this sounds simple) and yet people often don’t make this
decision before they start coding. If your plan is “let’s jump in
and start coding,” fine. (Sometimes that’s appropriate when you have
a well-understood problem.) At least agree that this is the
plan.
You might also decide at this phase that
some additional process structure is necessary, but not the whole nine yards.
Understandably enough, some programmers like to work in “vacation
mode” in which no structure is imposed on the process of developing their
work; “It will be done when it’s done.” This can be appealing
for awhile, but I’ve found that having a few milestones along the way
helps to focus and galvanize your efforts around those milestones instead of
being stuck with the single goal of “finish the project.” In
addition, it divides the project into more bite-sized pieces and makes it seem
less threatening (plus the milestones offer more opportunities for
celebration).
When I began to study story structure (so
that I will someday write a novel) I was initially resistant to the idea of
structure, feeling that when I wrote I simply let it flow onto the page. But I
later realized that when I write about computers the structure is clear enough
so that I don’t think much about it. But I still structure my work, albeit
only semi-consciously in my head. So even if you think that your plan is to just
start coding, you still somehow go through the subsequent phases while asking
and answering certain questions.
The mission statement
Any system you build, no matter how
complicated, has a fundamental purpose, the business that it’s in, the
basic need that it satisfies. If you can look past the user interface, the
hardware- or system-specific details, the coding algorithms and the efficiency
problems, you will eventually find the core of its being, simple and
straightforward. Like the so-called
high concept from a
Hollywood movie, you can describe it in one or two sentences. This pure
description is the starting point.
The high concept is quite important
because it sets the tone for your project; it’s a mission statement. You
won’t necessarily get it right the first time (you may be in a later phase
of the project before it becomes completely clear), but keep trying until it
feels right. For example, in an air-traffic control system you may start out
with a high concept focused on the system that you’re building: “The
tower program keeps track of the aircraft.” But consider what happens when
you shrink the system to a very small airfield; perhaps there’s only a
human controller or none at all. A more useful model won’t concern the
solution you’re creating as much as it describes the problem:
“Aircraft arrive, unload, service and reload, and
depart.”
Phase 1: What are we making?
In the previous generation of program
design (called procedural design), this is called “creating the
requirements analysis and
system
specification.” These, of course, were places to get lost;
intimidatingly-named documents that could become big projects in their own
right. Their intention was good, however. The requirements analysis says
“Make a list of the guidelines we will use to know when the job is done
and the customer is satisfied.” The system specification says
“Here’s a description of what the program will do (not
how) to satisfy the requirements.” The requirements analysis is
really a contract between you and the customer (even if the customer works
within your company or is some other object or system). The system specification
is a top-level exploration into the problem and in some sense a discovery of
whether it can be done and how long it will take. Since both of these will
require consensus among people (and because they will usually change over time),
I think it’s best to keep them as bare as possible – ideally, to
lists and basic diagrams – to save time. You might have other constraints
that require you to expand them into bigger documents, but by keeping the
initial document small and concise, it can be created in a few sessions of group
brainstorming with a leader who dynamically creates the description. This not
only solicits input from everyone, it also fosters initial buy-in and agreement
by everyone on the team. Perhaps most importantly, it can kick off a project
with a lot of enthusiasm.
It’s necessary to stay focused on
the heart of what you’re trying to accomplish in this phase: determine
what the system is supposed to do. The most valuable tool for this is a
collection of what are called “use cases.”
Use cases identify key features in the system that will reveal some of the
fundamental classes you’ll be using. These are essentially descriptive
answers to questions
like[11]:
- "Who will use this system?"
- "What can those
actors do with the system?"
- "How does this actor
do that with this
system?"
- "How else
might this work if someone else were doing this, or if the same actor had a
different objective?" (to reveal
variations)
- "What
problems might happen while doing this with the system?" (to reveal
exceptions)
If you are
designing an auto-teller, for example, the use case for a particular aspect of
the functionality of the system is able to describe what the auto-teller does in
every possible situation. Each of these “situations” is referred to
as a scenario, and a use case can be considered a
collection of scenarios. You can think of a scenario as a question that starts
with: “What does the system do if...?” For example, “What does
the auto-teller do if a customer has just deposited a check within 24 hours and
there’s not enough in the account without the check to provide the desired
withdrawal?”
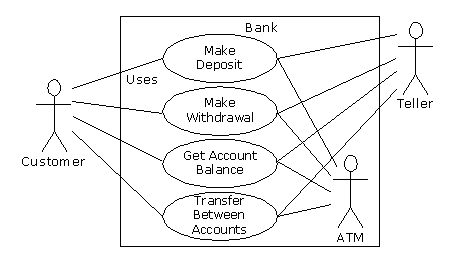
Use case diagrams
are intentionally simple to prevent you from getting bogged down in system
implementation details prematurely:
Each stick person represents an
“actor,” which is typically a human or some
other kind of free agent. (These can even be other computer systems, as is the
case with “ATM.”) The box represents the boundary of your system.
The ellipses represent the use cases, which are descriptions of valuable work
that can be performed with the system. The lines between the actors and the use
cases represent the interactions.
It doesn’t matter how the system is
actually implemented, as long as it looks like this to the
user.
A use case does not need to be terribly
complex, even if the underlying system is complex. It is only intended to show
the system as it appears to the user. For example:
The use cases produce the requirements
specifications by determining all the interactions that the user may have with
the system. You try to discover a full set of use cases for your system, and
once you’ve done that you have the core of what the system is supposed to
do. The nice thing about focusing on use cases is that they always bring you
back to the essentials and keep you from drifting off into issues that
aren’t critical for getting the job done. That is, if you have a full set
of use cases you can describe your system and move onto the next phase. You
probably won’t get it all figured out perfectly on the first try, but
that’s OK. Everything will reveal itself in time, and if you demand a
perfect system specification at this point you’ll get
stuck.
If you get stuck, you can kick-start this
phase by using a rough approximation tool: describe the system in a few
paragraphs and then look for nouns and verbs. The nouns can suggest actors,
context of the use case (e.g. “lobby”), or artifacts manipulated in
the use case. Verbs can suggest interactions between actors and use cases, and
specify steps within the use case. You’ll also discover that nouns and
verbs produce objects and messages during the design phase (and note that use
cases describe interactions between subsystems, so the “noun and
verb” technique can be used only as a brainstorming tool as it does not
generate use cases)
[12].
The boundary between a use case and an
actor can point out the existence of a
user interface, but it does not
define such a user interface. For a process of defining and creating user
interfaces, see Software for Use by Larry Constantine and Lucy Lockwood,
(Addison Wesley Longman, 1999) or go to www.ForUse.com.
Although it’s a black art, at this
point some kind of basic scheduling is important. You now
have an overview of what you’re building so you’ll probably be able
to get some idea of how long it will take. A lot of factors come into play here.
If you estimate a long schedule then the company might decide not to build it
(and thus use their resources on something more reasonable – that’s
a good thing). Or a manager might have already decided how long the
project should take and will try to influence your estimate. But it’s best
to have an honest schedule from the beginning and deal with the tough decisions
early. There have been a lot of attempts to come up with accurate scheduling
techniques (like techniques to predict the stock market), but probably the best
approach is to rely on your experience and intuition. Get a gut feeling for how
long it will really take, then double that and add 10 percent. Your gut feeling
is probably correct; you can get something working in that time. The
“doubling” will turn that into something decent, and the 10 percent
will deal with the final polishing and
details[13].
However you want to explain it, and regardless of the moans and manipulations
that happen when you reveal such a schedule, it just seems to work out that
way.
Phase 2: How will we build it?
In this phase you must come up with a
design that describes what the classes look like and how they will interact. An
excellent technique in determining classes and interactions is the
Class-Responsibility-Collaboration
(CRC) card. Part of the value of this tool is that it’s so low-tech: you
start out with a set of blank 3” by 5” cards, and you write on them.
Each card represents a single class, and on the card you write:
- The name of the class.
It’s important that this name capture the essence of what the class does,
so that it makes sense at a
glance.
- The
“responsibilities” of the class: what it should do. This can
typically be summarized by just stating the names of the member functions (since
those names should be descriptive in a good design), but it does not preclude
other notes. If you need to seed the process, look at the problem from a lazy
programmer’s standpoint: What objects would you like to magically appear
to solve your
problem?
- The
“collaborations” of the class: what other classes does it interact
with? “Interact” is an intentionally broad term; it could mean
aggregation or simply that some other object exists that will perform services
for an object of the class. Collaborations should also consider the audience for
this class. For example, if you create a class Firecracker, who is going
to observe it, a Chemist or a Spectator? The former will want to
know what chemicals go into the construction, and the latter will respond to the
colors and shapes released when it
explodes.
You may feel like
the cards should be bigger because of all the information you’d like to
get on them, but they are intentionally small, not only to keep your classes
small but also to keep you from getting into too much detail too early. If you
can’t fit all you need to know about a class on a small card, the class is
too complex (either you’re getting too detailed, or you should create more
than one class). The ideal class should be understood at a glance. The idea of
CRC cards is to assist you in coming up with a first cut of the design so that
you can get the big picture and then refine your design.
One of the great benefits of CRC cards is
in communication. It’s best done real-time, in a group, without computers.
Each person takes responsibility for several classes (which at first have no
names or other information). You run a live simulation by solving one scenario
at a time, deciding which messages are sent to the various objects to satisfy
each scenario. As you go through this process, you discover the classes that you
need along with their responsibilities and collaborations, and you fill out the
cards as you do this. When you’ve moved through all the use cases, you
should have a fairly complete first cut of your design.
Before I began using CRC cards, the most
successful consulting experiences I had when coming up with an initial design
involved standing in front of a team, who hadn’t built an OOP project
before, and drawing objects on a whiteboard. We talked about how the objects
should communicate with each other, and erased some of them and replaced them
with other objects. Effectively, I was managing all the “CRC cards”
on the whiteboard. The team (who knew what the project was supposed to do)
actually created the design; they “owned” the design rather than
having it given to them. All I was doing was guiding the process by asking the
right questions, trying out the assumptions, and taking the feedback from the
team to modify those assumptions. The true beauty of the process was that the
team learned how to do object-oriented design not by reviewing abstract
examples, but by working on the one design that was most interesting to them at
that moment: theirs.
Once you’ve come up with a set of
CRC cards, you may want to create a more formal description of your design using
UML[14]. You
don’t need to use UML, but it can be helpful,
especially if you want to put up a diagram on the wall for everyone to ponder,
which is a good idea. An alternative to UML is a textual description of the
objects and their interfaces, or, depending on your programming language, the
code
itself[15].
UML also provides an additional
diagramming notation for describing the dynamic model of your system. This is
helpful in situations in which the state transitions of a system or subsystem
are dominant enough that they need their own diagrams (such as in a control
system). You may also need to describe the data structures, for systems or
subsystems in which data is a dominant factor (such as a
database).
You’ll know you’re done with
phase 2 when you have described the objects and their interfaces. Well, most of
them – there are usually a few that slip through the cracks and
don’t make themselves known until phase 3. But that’s OK. All you
are concerned with is that you eventually discover all of your objects.
It’s nice to discover them early in the process but OOP provides enough
structure so that it’s not so bad if you discover them later. In fact, the
design of an object tends to happen in five stages, throughout the process of
program
development.
Five stages of object
design
The design life of an object is not
limited to the time when you’re writing the program. Instead, the design
of an object appears over a sequence of stages. It’s helpful to have this
perspective because you stop expecting perfection right away; instead, you
realize that the understanding of what an object does and what it should look
like happens over time. This view also applies to the design of various types of
programs; the pattern for a particular type of program emerges through
struggling again and again with that problem (Design Patterns are covered
in Volume 2). Objects, too, have their patterns that emerge through
understanding, use, and reuse.
1. Object
discovery. This stage occurs during the
initial analysis of a program. Objects may be discovered by looking for external
factors and boundaries, duplication of elements in the system, and the smallest
conceptual units. Some objects are obvious if you already have a set of class
libraries. Commonality between classes suggesting base classes and inheritance
may appear right away, or later in the design process.
2. Object
assembly. As you’re building an
object you’ll discover the need for new members that didn’t appear
during discovery. The internal needs of the object may require other classes to
support it.
3. System
construction. Once again, more
requirements for an object may appear at this later stage. As you learn, you
evolve your objects. The need for communication and interconnection with other
objects in the system may change the needs of your classes or require new
classes. For example, you may discover the need for facilitator or helper
classes, such as a linked list, that contain little or no state information and
simply help other classes function.
4. System
extension. As you add new features to a
system you may discover that your previous design doesn’t support easy
system extension. With this new information, you can restructure parts of the
system, possibly adding new classes or class hierarchies.
5. Object
reuse. This is the
real stress test for a class. If someone tries to reuse it in an entirely new
situation, they’ll probably discover some shortcomings. As you change a
class to adapt to more new programs, the general principles of the class will
become clearer, until you have a truly reusable type. However, don’t
expect most objects from a system design to be reusable – it is perfectly
acceptable for the bulk of your objects to be system-specific. Reusable types
tend to be less common, and they must solve more general problems in order to be
reusable.
Guidelines for object
development
These stages suggest some guidelines when
thinking about developing your classes:
- Let a specific problem
generate a class, then let the class grow and mature during the solution of
other
problems.
- Remember,
discovering the classes you need (and their interfaces) is the majority of the
system design. If you already had those classes, this would be an easy
project.
- Don’t
force yourself to know everything at the beginning; learn as you go. This will
happen anyway.
- Start
programming; get something working so you can prove or disprove your design.
Don’t fear that you’ll end up with procedural-style spaghetti code
– classes partition the problem and help control anarchy and entropy. Bad
classes do not break good
classes.
- Always keep
it simple. Little clean objects with obvious utility are better than big
complicated interfaces. When decision points come up, use an Occam’s Razor
approach: Consider the choices and select the one that is simplest, because
simple classes are almost always best. Start small and simple, and you can
expand the class interface when you understand it better, but as time goes on,
it’s difficult to remove elements from a
class.
Phase 3: Build the core
This is the initial conversion from the
rough design into a compiling and executing body of code that can be tested, and
especially that will prove or disprove your architecture. This is not a one-pass
process, but rather the beginning of a series of steps that will iteratively
build the system, as you’ll see in phase 4.
Your goal is to find the core of your
system architecture that needs to be implemented in order to generate a running
system, no matter how incomplete that system is in this initial pass.
You’re creating a framework that you can build upon with further
iterations. You’re also performing the first of many system integrations
and tests, and giving the stakeholders feedback about what their system will
look like and how it is progressing. Ideally, you are also exposing some of the
critical risks. You’ll probably also discover changes and improvements
that can be made to your original architecture – things you would not have
learned without implementing the system.
Part of building the system is the
reality check that you get from testing against your requirements analysis and
system specification (in whatever form they exist). Make sure that your tests
verify the requirements and use cases. When the core of the system is stable,
you’re ready to move on and add more
functionality.
Phase 4: Iterate the use cases
Once the core framework is running, each
feature set you add is a small project in itself. You add a feature set during
an iteration, a reasonably short period of
development.
How big is an iteration? Ideally, each
iteration lasts one to three weeks (this can vary based on the implementation
language). At the end of that period, you have an integrated, tested system with
more functionality than it had before. But what’s particularly interesting
is the basis for the iteration: a single use case. Each use case is a package of
related functionality that you build into the system all at once, during one
iteration. Not only does this give you a better idea of what the
scope of a use case should be, but
it also gives more validation to the idea of a use case, since the concept
isn’t discarded after analysis and design, but instead it is a fundamental
unit of development throughout the software-building process.
You stop iterating when you achieve
target functionality or an external deadline arrives and the customer can be
satisfied with the current version. (Remember, software is a subscription
business.) Because the process is iterative, you have many opportunities to ship
a product instead of a single endpoint; open-source projects work exclusively in
an iterative, high-feedback environment, which is precisely what makes them
successful.
An iterative development process is
valuable for many reasons. You can reveal and resolve critical risks early, the
customers have ample opportunity to change their minds, programmer satisfaction
is higher, and the project can be steered with more precision. But an additional
important benefit is the feedback to the stakeholders, who can see by the
current state of the product exactly where everything lies. This may reduce or
eliminate the need for mind-numbing status meetings and increase the confidence
and support from the stakeholders.
Phase 5: Evolution
This is the point in the development
cycle that has traditionally been called
“maintenance,” a
catch-all term that can mean everything from “getting it to work the way
it was really supposed to in the first place” to “adding features
that the customer forgot to mention” to the more traditional “fixing
the bugs that show up” and “adding new features as the need
arises.” So many misconceptions have been applied to the term
“maintenance” that it has taken on a slightly deceiving quality,
partly because it suggests that you’ve actually built a pristine program
and all you need to do is change parts, oil it, and keep it from rusting.
Perhaps there’s a better term to describe what’s going
on.
I’ll use the term
evolution[16].
That is, “You won’t get it right the first time, so give yourself
the latitude to learn and to go back and make changes.” You might need to
make a lot of changes as you learn and understand the problem more deeply. The
elegance you’ll produce if you evolve until you get it right will pay off,
both in the short and the long term. Evolution is where your program goes from
good to great, and where those issues that you didn’t really understand in
the first pass become clear. It’s also where your classes can evolve from
single-project usage to reusable resources.
What it means to “get it
right” isn’t just that the program works according to the
requirements and the use cases. It also means that the internal structure of the
code makes sense to you, and feels like it fits together well, with no awkward
syntax, oversized objects, or ungainly exposed bits of code. In addition, you
must have some sense that the program structure will survive the changes that it
will inevitably go through during its lifetime, and that those changes can be
made easily and cleanly. This is no small feat. You must not only understand
what you’re building, but also how the program will evolve (what I call
the vector of
change[17]).
Fortunately, object-oriented programming languages are particularly adept at
supporting this kind of continuing modification – the boundaries created
by the objects are what tend to keep the structure from breaking down. They also
allow you to make changes – ones that would seem drastic in a procedural
program – without causing earthquakes throughout your code. In fact,
support for evolution might be the most important benefit of
OOP.
With evolution, you create something that
at least approximates what you think you’re building, and then you kick
the tires, compare it to your requirements and see where it falls short. Then
you can go back and fix it by redesigning and re-implementing the portions of
the program that didn’t work
right[18].
You might actually need to solve the problem, or an aspect of the problem,
several times before you hit on the right solution. (A study of
Design Patterns, described
in Volume 2, is usually helpful here.)
Evolution also occurs when you build a
system, see that it matches your requirements, and then discover it wasn’t
actually what you wanted. When you see the system in operation, you find that
you really wanted to solve a different problem. If you think this kind of
evolution is going to happen, then you owe it to yourself to build your first
version as quickly as possible so you can find out if it is indeed what you
want.
Perhaps the most important thing to
remember is that by default – by definition, really – if you modify
a class then its super- and subclasses will still function. You need not fear
modification (especially if you have a built-in set of unit tests to verify the
correctness of your modifications). Modification won’t necessarily break
the program, and any change in the outcome will be limited to subclasses and/or
specific collaborators of the class you
change.
Plans pay off
Of course you wouldn’t build a
house without a lot of carefully-drawn plans. If you build a deck or a dog
house, your plans won’t be so elaborate but you’ll probably still
start with some kind of sketches to guide you on your way. Software development
has gone to extremes. For a long time, people didn’t have much structure
in their development, but then big projects began failing. In reaction, we ended
up with methodologies that had an intimidating amount of structure and detail,
primarily intended for those big projects. These methodologies were too scary to
use – it looked like you’d spend all your time writing documents and
no time programming. (This was often the case.) I hope that what I’ve
shown you here suggests a middle path – a sliding scale. Use an approach
that fits your needs (and your personality). No matter how minimal you choose to
make it, some kind of plan will make a big improvement in your project as
opposed to no plan at all. Remember that, by most estimates, over 50 percent of
projects fail (some estimates go up to 70 percent!).
By following a plan – preferably
one that is simple and brief – and coming up with design structure before
coding, you’ll discover that things fall together far more easily than if
you dive in and start hacking, and you’ll also realize a great deal of
satisfaction. It’s my experience that coming up with an elegant solution
is deeply satisfying at an entirely different level; it feels closer to art than
technology. And elegance always pays off; it’s not
a frivolous pursuit. Not only does it give you a program that’s easier to
build and debug, but it’s also easier to understand and maintain, and
that’s where the financial value
lies.
 |
|
| |
|